今天我们来说说有关于:“bootstrap进度条怎么写?”这个问题,小编从网上找到了相关的一些关于Bootstrap进度条的资料大家可以作为参考和学习。
bootstrap进度条是使用 CSS3 过度和动画来实现的效果,而且在 IE9 以及之前的版本还有旧版的 Firefox 也不支持这个特性,然而Opera12不支持动画。那么接下来我们来看看有哪几种进度条设计方案吧!
1.默认进度条我们通过创建.html文件,在文件中加入 <div>标签在使用我们的类选择器,代码和运行结果如下:
<html>
<head>
	<meta charset="utf-8">
	<title>Bootstrap 实例 - 进度条</title>
	<link rel="stylesheet" href="https://cdn.staticfile.org/twitter-bootstrap/3.3.7/css/bootstrap.min.css">
	<script src="https://cdn.staticfile.org/jquery/2.1.1/jquery.min.js"></script>
	<script src="https://cdn.staticfile.org/twitter-bootstrap/3.3.7/js/bootstrap.min.js"></script>
<style>
.progress{
	margin-top: 10px;
}
</style>
</head>
<body>
<div class="progress" >
	<div class="progress-bar" role="progressbar" aria-valuenow="60"
		 aria-valuemin="0" aria-valuemax="100" style="width: 40%;">
		<span class="sr-only">40% 完成</span>
	</div>
</div>
</body>
</html>

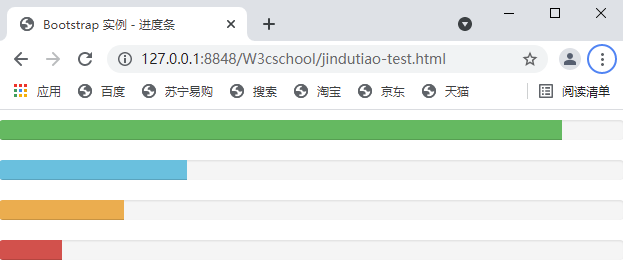
2.交替进度条
按照我们创建的项目中添加我们的类选择器名称,代码和运行结果如下:
<html>
<head>
	<meta charset="utf-8">
	<title>Bootstrap 实例 - 交替的进度条</title>
	<link rel="stylesheet" href="https://cdn.staticfile.org/twitter-bootstrap/3.3.7/css/bootstrap.min.css">
	<script src="https://cdn.staticfile.org/jquery/2.1.1/jquery.min.js"></script>
	<script src="https://cdn.staticfile.org/twitter-bootstrap/3.3.7/js/bootstrap.min.js"></script>
<style>
.progress{
	margin-top: 10px;
}
</style>
</head>
<body>
<div class="progress">
	<div class="progress-bar progress-bar-success" role="progressbar"
		 aria-valuenow="60" aria-valuemin="0" aria-valuemax="100"
		 style="width: 90%;">
		<span class="sr-only">90% 完成(成功)</span>
	</div>
</div>
<div class="progress">
	<div class="progress-bar progress-bar-info" role="progressbar"
		 aria-valuenow="60" aria-valuemin="0" aria-valuemax="100"
		 style="width: 30%;">
		<span class="sr-only">30% 完成(信息)</span>
	</div>
</div>
<div class="progress">
	<div class="progress-bar progress-bar-warning" role="progressbar"
		 aria-valuenow="60" aria-valuemin="0" aria-valuemax="100"
		 style="width: 20%;">
		<span class="sr-only">20% 完成(警告)</span>
	</div>
</div>
<div class="progress">
	<div class="progress-bar progress-bar-danger" role="progressbar"
		 aria-valuenow="60" aria-valuemin="0" aria-valuemax="100"
		 style="width: 10%;">
		<span class="sr-only">10% 完成(危险)</span>
	</div>
</div>
</body>
</html>

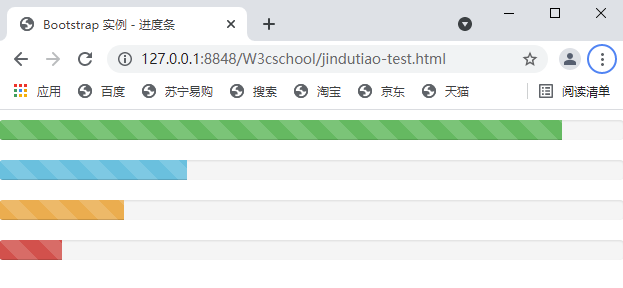
3.条纹进度条
我们通过在代码中的类选择器中加入class .progress 和 .progress-striped,代码和运行结果如下:
<html>
<head>
	<meta charset="utf-8">
    <title>Bootstrap 实例 - 条纹的进度条</title>
	<link rel="stylesheet" href="https://cdn.staticfile.org/twitter-bootstrap/3.3.7/css/bootstrap.min.css">
	<script src="https://cdn.staticfile.org/jquery/2.1.1/jquery.min.js"></script>
	<script src="https://cdn.staticfile.org/twitter-bootstrap/3.3.7/js/bootstrap.min.js"></script>
<style>
.progress{
	margin-top: 10px;
}
</style>
</head>
<body>
<div class="progress progress-striped">
    <div class="progress-bar progress-bar-success" role="progressbar"
         aria-valuenow="60" aria-valuemin="0" aria-valuemax="100"
         style="width: 90%;">
        <span class="sr-only">90% 完成(成功)</span>
    </div>
</div>
<div class="progress progress-striped">
    <div class="progress-bar progress-bar-info" role="progressbar"
         aria-valuenow="60" aria-valuemin="0" aria-valuemax="100"
         style="width: 30%;">
        <span class="sr-only">30% 完成(信息)</span>
    </div>
</div>
<div class="progress progress-striped">
    <div class="progress-bar progress-bar-warning" role="progressbar"
         aria-valuenow="60" aria-valuemin="0" aria-valuemax="100"
         style="width: 20%;">
        <span class="sr-only">20% 完成(警告)</span>
    </div>
</div>
<div class="progress progress-striped">
    <div class="progress-bar progress-bar-danger" role="progressbar"
         aria-valuenow="60" aria-valuemin="0" aria-valuemax="100"
         style="width: 10%;">
        <span class="sr-only">10% 完成(危险)</span>
    </div>
</div>
</body>
</html>

4.动画进度条
我们在.html文件中的<body>标签内创建两个<div>标签并且设置类属性名为class .progress 和 .progress-striped,代码和运行结果如下:
<html>
<head>
	<meta charset="utf-8">
	<title>Bootstrap 实例 - 动画的进度条</title>
	<link rel="stylesheet" href="https://cdn.staticfile.org/twitter-bootstrap/3.3.7/css/bootstrap.min.css">
	<script src="https://cdn.staticfile.org/jquery/2.1.1/jquery.min.js"></script>
	<script src="https://cdn.staticfile.org/twitter-bootstrap/3.3.7/js/bootstrap.min.js"></script>
<style>
.progress{
	margin-top: 10px;
}
</style>
</head>
<body>
<div class="progress progress-striped active">
	<div class="progress-bar progress-bar-success" role="progressbar"
		 aria-valuenow="60" aria-valuemin="0" aria-valuemax="100"
		 style="width: 40%;">
		<span class="sr-only">40% 完成</span>
	</div>
</div>
</body>
</html>

5.堆叠进度条
我们在通过对每个<div>标签进行设置从而实现我们想要的效果,代码和运行截图如下:
<html>
<head>
	<meta charset="utf-8">
	<title>Bootstrap 实例 - 堆叠的进度条</title>
	<link rel="stylesheet" href="https://cdn.staticfile.org/twitter-bootstrap/3.3.7/css/bootstrap.min.css">
	<script src="https://cdn.staticfile.org/jquery/2.1.1/jquery.min.js"></script>
	<script src="https://cdn.staticfile.org/twitter-bootstrap/3.3.7/js/bootstrap.min.js"></script>
<style>
.progress{
	margin-top: 10px;
}
</head>
<body>
<div class="progress">
	<div class="progress-bar progress-bar-success" role="progressbar"
		 aria-valuenow="60" aria-valuemin="0" aria-valuemax="100"
		 style="width: 40%;">
		<span class="sr-only">40% 完成</span>
	</div>
	<div class="progress-bar progress-bar-info" role="progressbar"
		 aria-valuenow="60" aria-valuemin="0" aria-valuemax="100"
		 style="width: 30%;">
		<span class="sr-only">30% 完成(信息)</span>
	</div>
	<div class="progress-bar progress-bar-warning" role="progressbar"
		 aria-valuenow="60" aria-valuemin="0" aria-valuemax="100"
		 style="width: 20%;">
		<span class="sr-only">20% 完成(警告)</span>
	</div>
</div>
</body>
</html>

总结:
这就是有关于:“bootstrap进度条怎么写?”这个问题小编的一些相关的内容,当然如果你觉得你有更好的想法也可以和大家一起分享你的心得体会。当然更多有关于bootstrap相关的学习知识内容我们都可以在Bootstrap 教程中进行学习和了解。

 免费AI编程助手


